
Introduction – Part 2
Welcome to the second installment of my 2-part article series on using Microsoft Office products to execute document automation workflows. The intent of this article series is to show how you can use Microsoft SharePoint and Power Automate to create and auto-fill documents.
My example pulls data from a SharePoint list and inserts the information into predefined fields in a document template. The list I use in my demo records employee leave of absence requests. When a new request is added, or an existing request is edited Power Automate will automatically run a workflow that accesses the employee information in the list to create a leave of absence notification that can be sent to HR.
Although this is a rather simple example, it shows how to implement a basic form of automation to populate fields in documents. You can easily expand upon the principles learned in this article series to create complex, data-driven documents that will help your user community save time and improve accuracy.
Power Automate is a very robust product that receives excellent reviews from the IT community. After finishing this installment, check out Power Automate’s documentation to learn more about its robust capabilities.
Part 2 of a 2-Part Article Series
Because of the step-by-step screen prints, I have separated this article into two posts.
- In Part 1, we learned how to create and configure the SharePoint components we need to contain our document and establish the relationships between our objects.
- In Part 2, we will use our newly created SharePoint components as input to our Power Automate workflow. The workflow will create and populate a document with the information we need to notify HR that an employee is requesting a leave of absence.
Creating the Microsoft Power Automate Document Automation
We will use Microsoft’s Power Automate to create our documents and autofill the fields we specified in our document template with data from our SharePoint list.
Power Automate is a powerful tool that is included with most business Office 365 subscriptions. We can use Power Automate to automate a wide variety of tasks in the Microsoft tech stack as well as third-party platforms like Salesforce. A whole series of articles can be written about Power Automate, but in our case we are going to begin by creating a simple job specifically for SharePoint.
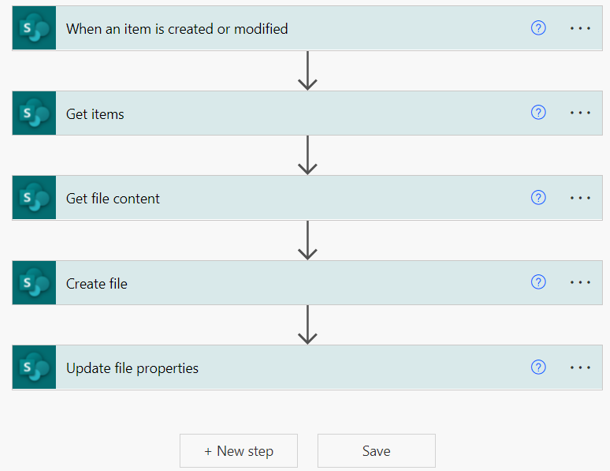
We will be creating the steps below to perform our document automation:
- When an item is created or modified
This will be the triggering event. When a manager adds a person to our EmployeeLOAList or edits an existing item, Power Automate will execute the steps after the trigger in our workflow below - Get items
This step will execute a query to access the information in our list to populate our leave of absence notification to HR - Get file content
The get file content step access the document template we created that has the content and the field names we added from our EmployeeLOAList - Create File
This step creates the leave of absence notification document that we will send to HR. We’ll establish the documents’ naming conventions to easily identify the documents - Update file properties
Our last step takes the information from the fields in our EmployeeLOAList and updates the document we created in Step 4 above. The document’s fields are populated and the automation is complete. We can access the new document in the library we created and send it to HR
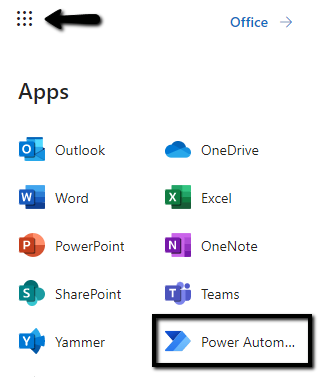
In the upper left corner of your SharePoint screen, you should see a button that allows you to display your applications. If Power Automate does not appear as an application, you will need to contact your SharePoint administrator.
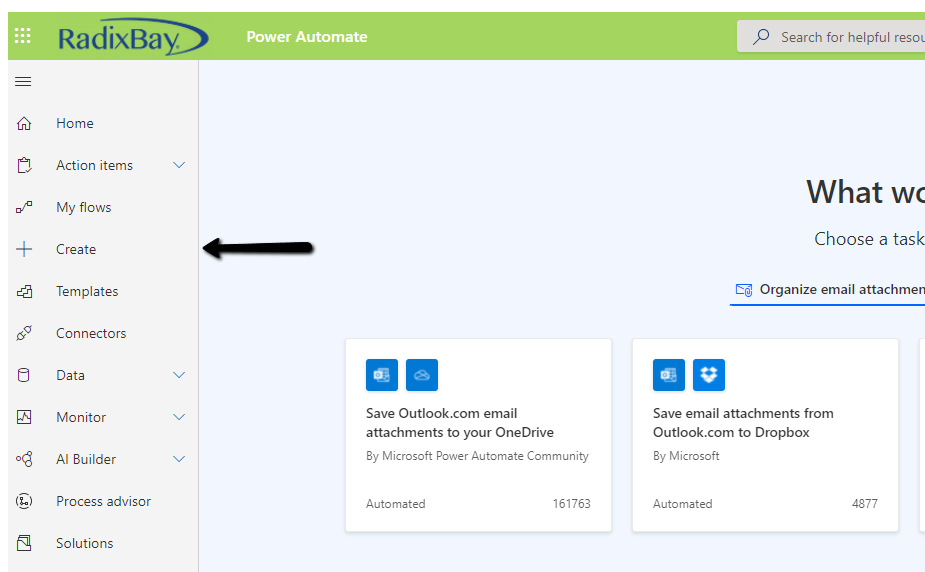
In Power Automate, click on the Create button on the left navigation bar.
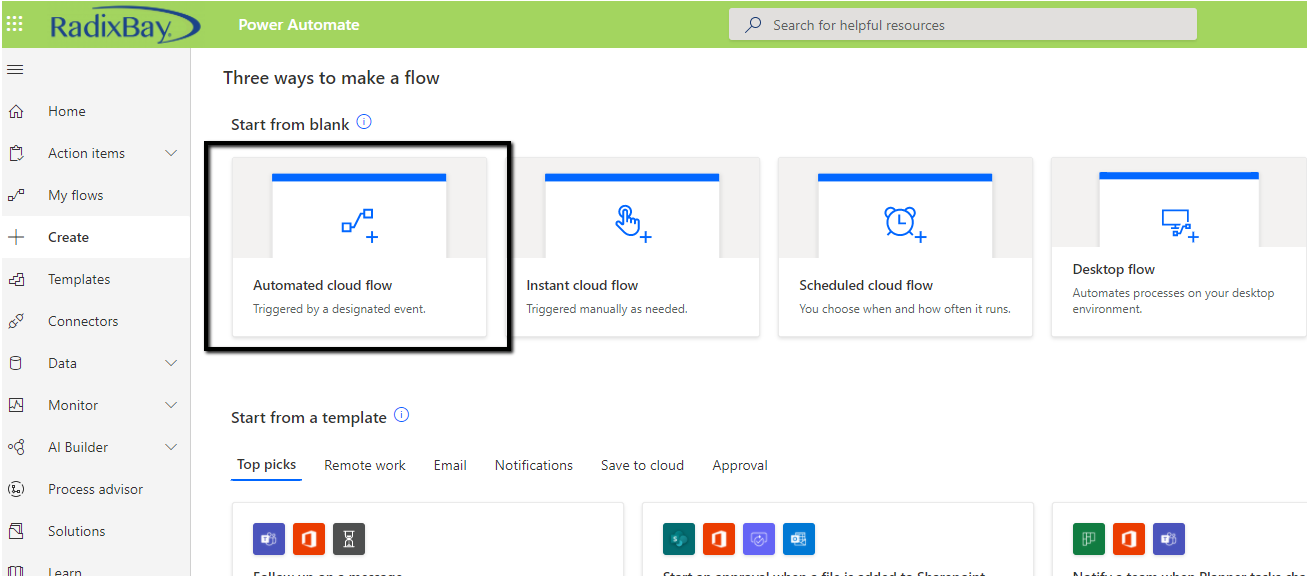
Then select the top box titled Automated cloud flow.
Give your flow a name, and search for the When an item is created or modified trigger.
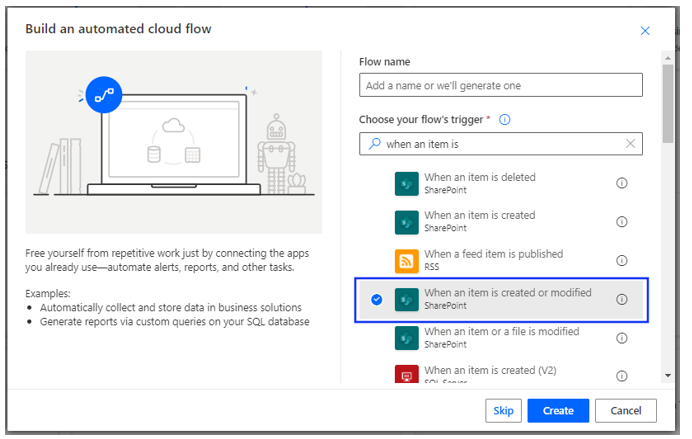
There will be two fields associated with this automation’s trigger. The SharePoint site you’re pulling the list from, and the name of the list itself. The drop down will allow you to select the list you created earlier. In our case, we will select EmployeeLOAList. This is the list we created at the beginning of our tutorial that contains the information for the employees requesting a leave of absence. The trigger will fire when an item is added or edited in the EmployeeLOAList.

Building the Triggered Workflow
To create a new step in the flow, click on the + New Step button.
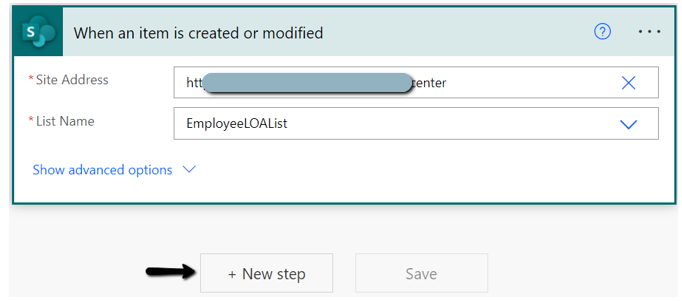
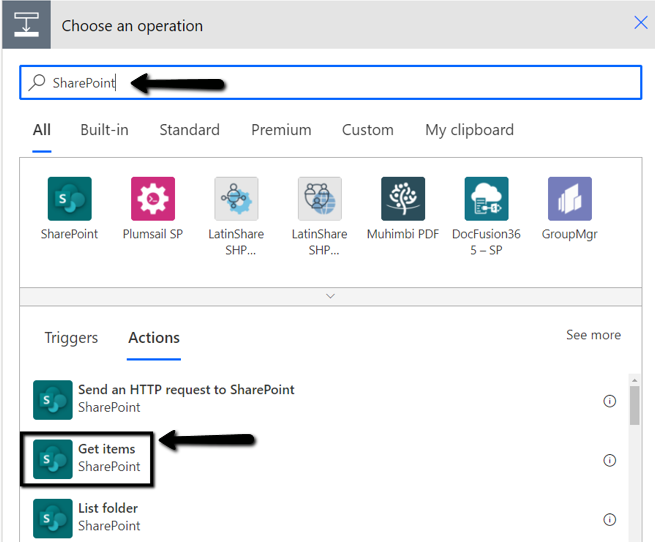
This will give you the option to add a direct action that will follow the node above, or branch your flow based on one or more conditions you specify. In our example, we will create a simple step-by-step flow with no conditional branches.
Search for the Get Items action in the actions search window and select it. The Get Items action will retrieve data from any SharePoint List on your site.
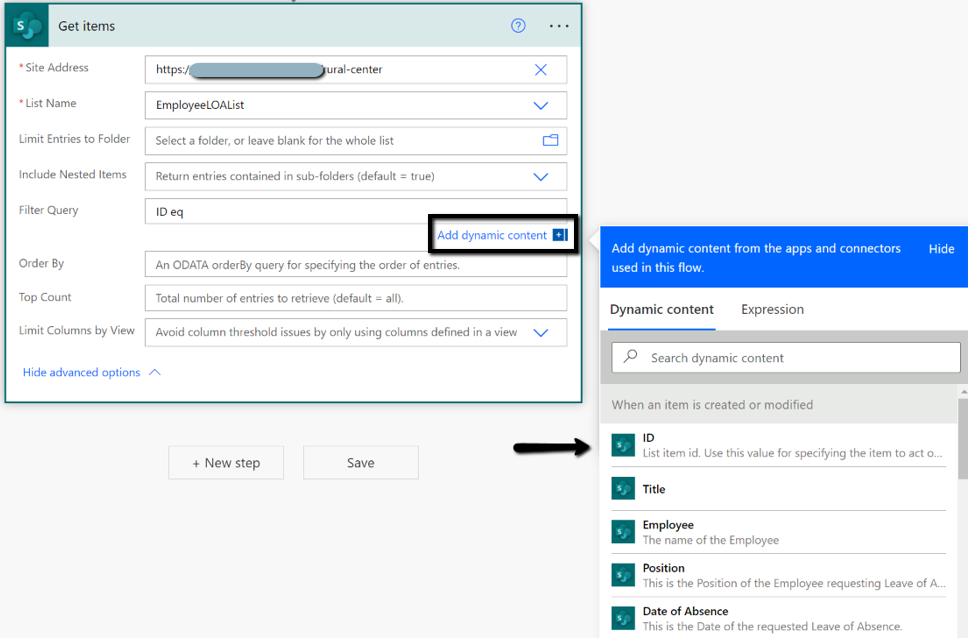
Enter the site address and the name of the list you created earlier.
You will also need to add a dynamic filter. Click on the Show Advanced Options in the Get Items node, and enter a filter query for the ID of the item in the list that was created or modified. Simply type ID eq followed by adding the dynamic ID variable from the triggered list item.
The next step in our workflow will be to retrieve the contents from the document template we uploaded to the content type in Part 1.
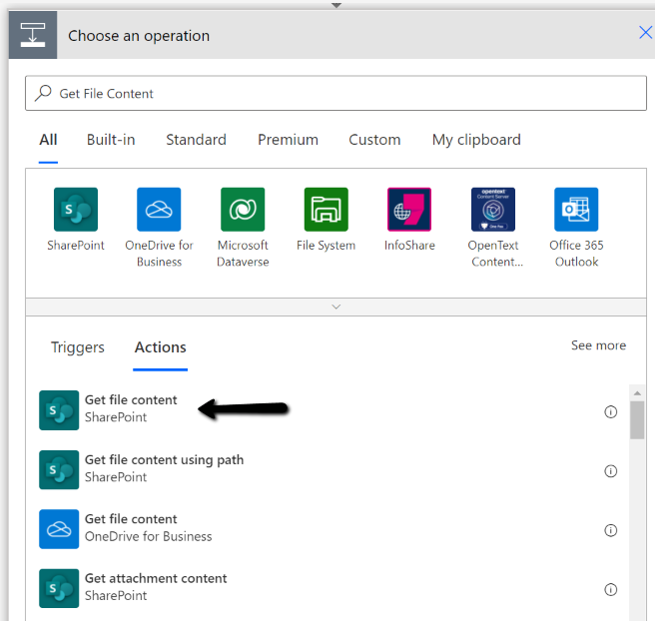
We will need to add a new step, which executes a Get file content action to our workflow.
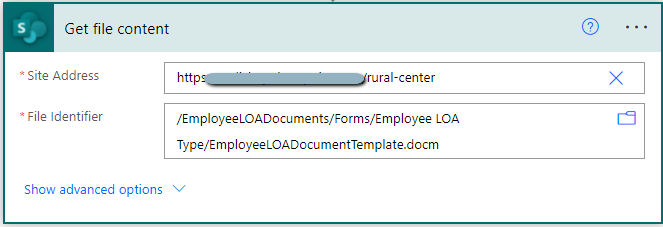
All that is needed for this action is the Site Address and the File Identifier. You’ll find this information in the Document Library -> Forms -> Document Type -> Template Doc section.
Creating our Documents
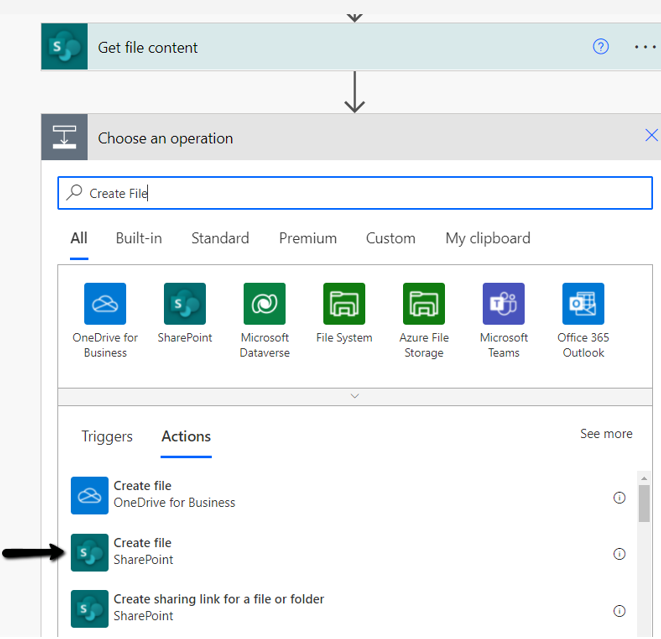
Our next step in our worfklow will create the documents that we will send to HR to notify them that an employee is requesting a leave of absence. We will use our Word template to automatically create the new documents in our Power Automate workflow.
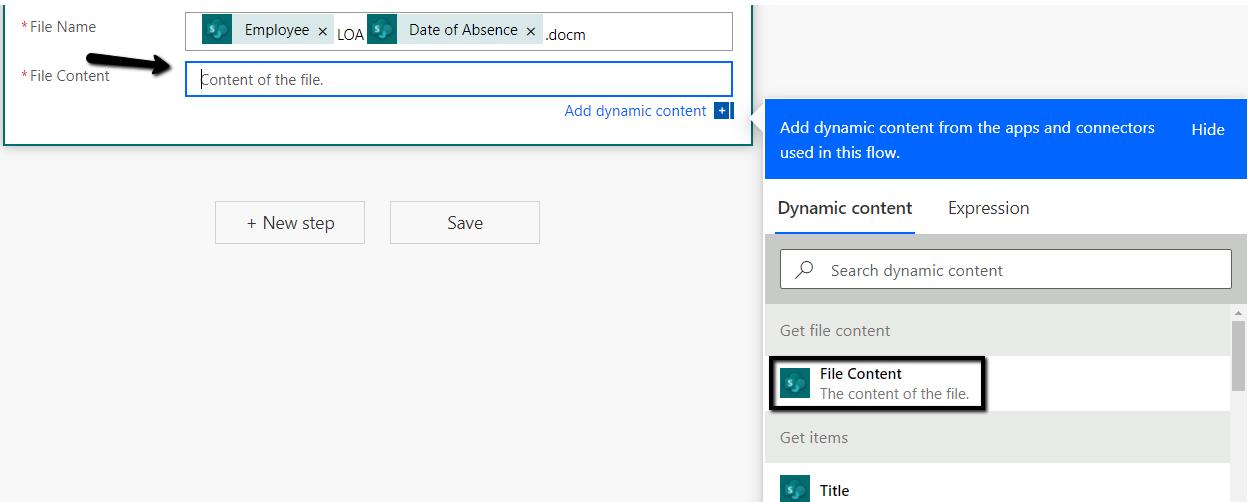
The name of the file is arbitrary. You can include any column value from the list item in your file name. In our example, the file name will include the employee’s name and date of absence to allow us to easily identify the document. Although you can establish your own naming conventions for your document file names, you will need to ensure that the names are unique.
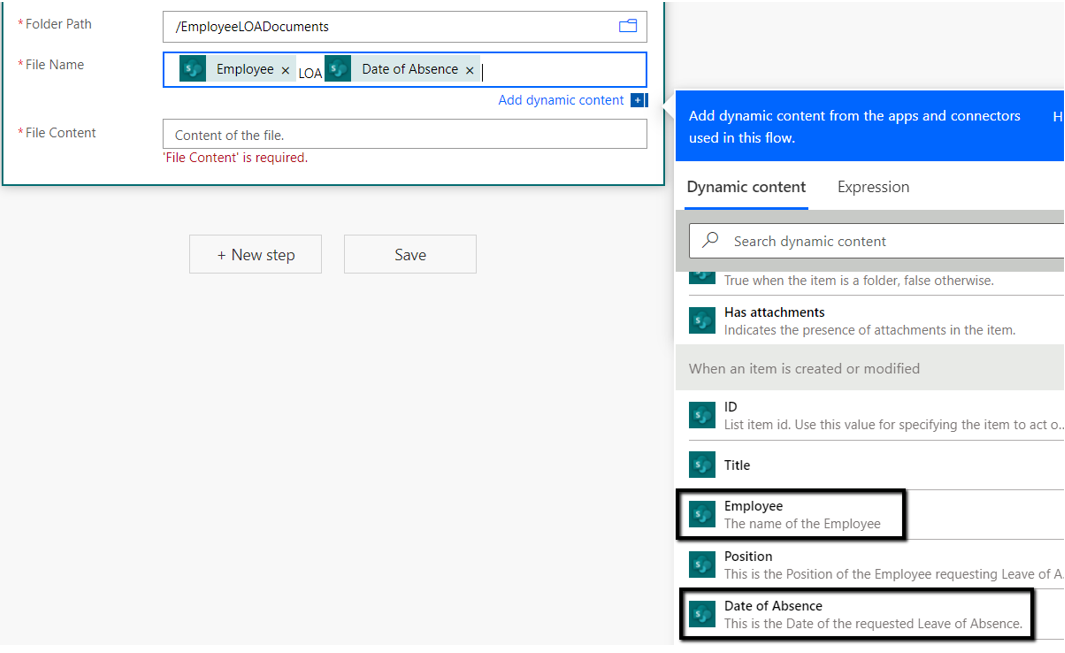
You will also need to include the dynamic variable File Content as the File Content input.
Updating Our Documents with SharePoint List Data
Now that our workflow is creating our documents for us, we need to configure them to be able to accept data from the SharePoint list we created. We do this by adding a new step that configures the file properties columns with our SharePoint list columns.
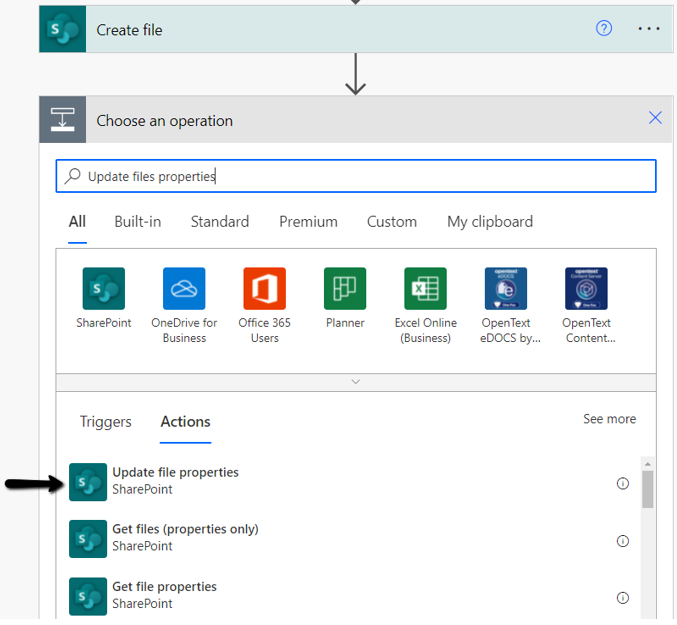
The column names from our content type that we associated with our document library will appear in our listing of file properties. We’ll update those in a minute.
Be sure to include itemId in the Id field of this node.
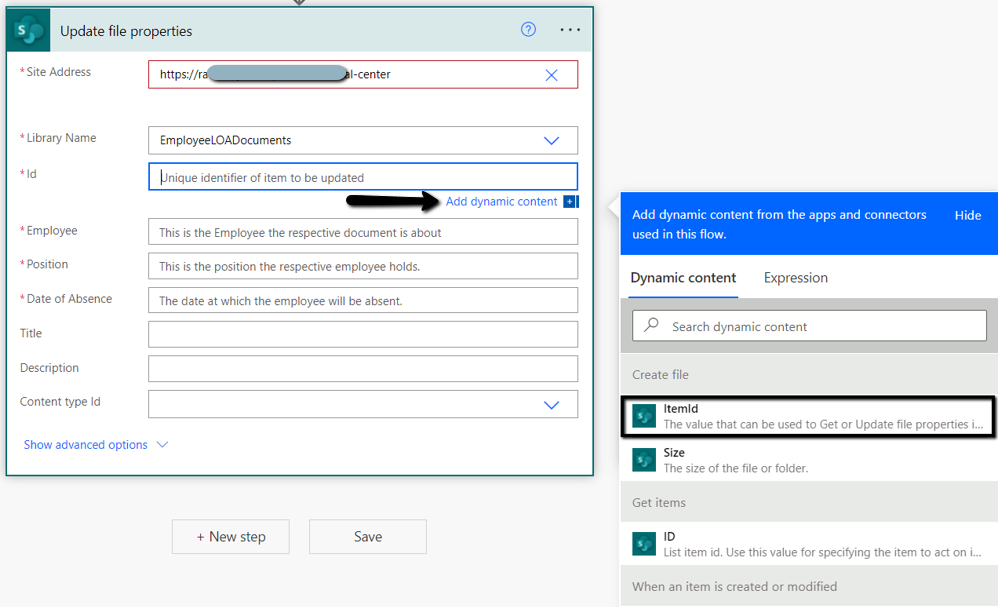
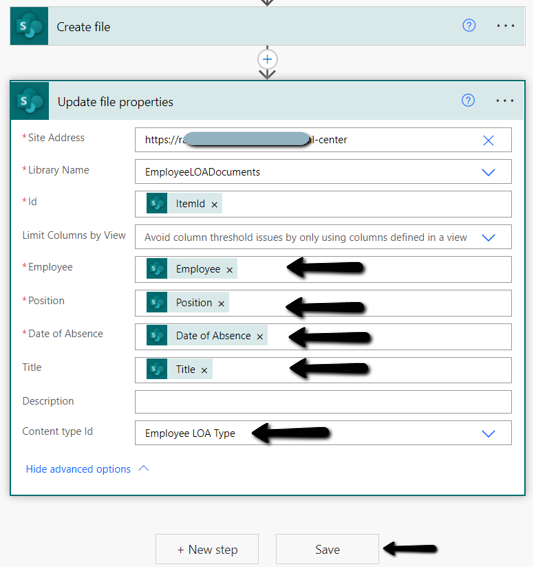
After you enter the SharePoint site address, the library you created earlier, and the Itemid, you can then add the column names from your SharePoint List to the update file properties form. Power Automate will associate the columns’ content in the list with the file property columns.
You will also need to enter the name of the content type you created in the Content type id field.
Your last step will be to hit Save. SharePoint will respond with a popup form that will allow you to name your new Power Automate workflow and save it in the library.
Testing your new Power Automate Workflow
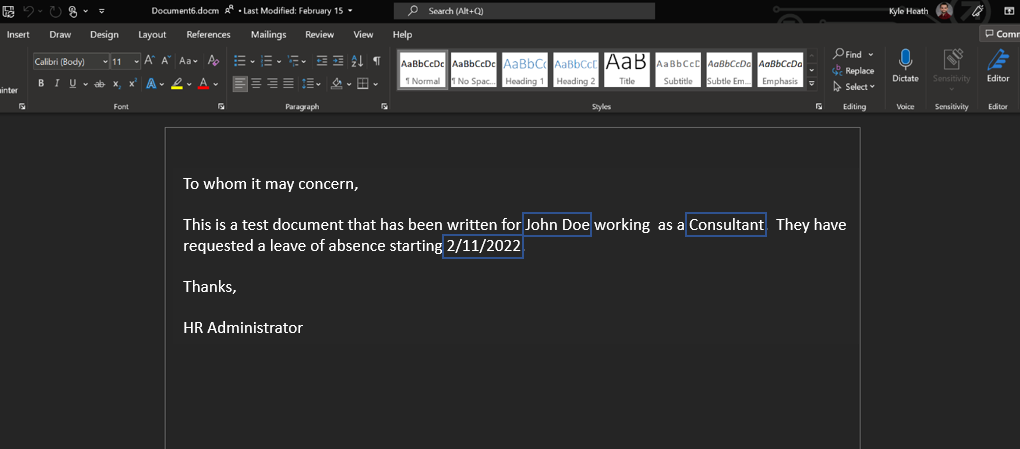
When your workflow is complete, you can test your setup by adding or editing an item in your SharePoint list. For my test, I added a new item to my EmployeeLOAList. The fields were employee=John Doe, position=Consultant, and date of absence = 2/11/2022. After I added the new item to my list, I went to the EmployeeLOADocuments SharePoint library and found the file that matched the naming conventions I configured in the Create File step of my Power Automate workflow.
Wrapup
The intent of this article series was to show how you can use Microsoft Office tools to build document workflows. Although my example was very simple, you can use these instructions as the foundation to create highly complex documents that are prepopulated with data from SharePoint lists. In addition, you can also leverage Power Automate’s branching capabilities to create decision trees that customize the document’s contents based on the decision-making criteria you specify. The workflow can also contain other actions that include multi-step approval processes.
My recommendation is to thoroughly review Power Automate’s capabilities. You’ll find that Power Automate’s wide range of automation capabilities, dozens of connectors to Microsoft and third-party products, and workflow templates will help your organization to easily automate a seemingly endless array of business operations.
Thanks for reading!

I hope you enjoyed my article on leveraging Microsoft Office Tools to autofill documents.
To learn more about our services and how RadixBay can help, please visit www.Radixbay.com.
Kyle Heath
RadixBay Managed Services Consultant