
- In Part 1, we will learn how to create and configure the SharePoint components we need to create our document and establish the relationships between our objects.
- In Part 2, we will use our newly created SharePoint components as input to our Power Automate workflow. The workflow will create and populate a document with the information we need to notify HR that an employee is requesting a leave of absence.
Introduction
From grocery stores and transportation to smart homes, automation is rapidly becoming a part of our everyday life. In the IT space, automation has become a critical component of an ever-growing list of tools, technologies, and applications.
In this article, we are going to leverage SharePoint and Power Automation to automate the generation of customized documents. The automation pulls data from a SharePoint list and inserts the information into predefined fields in a document template.
Although this is a rather simple example, it shows how to implement a basic form of automation to populate fields in documents. You can easily expand upon the principles learned in this article to create complex, data-driven documents that will help your user community save time and improve accuracy. The more complex the document, the greater the benefits!
2-Part Article Series
Because of the step-by-step screen prints, I have separated this article into two posts. Both posts will be available at the same time.
The example I use is a SharePoint list that records employee leave of absence requests. When a new leave of absence request is added to our SharePoint list, or an existing request is edited Power Automate will automatically run a workflow. The workflow accesses the employee information from the list to create a leave of absence notification document that can be sent to HR. Although attaching the notification to an email and sending it can also be part of the workflow, in this example I stopped after auto-filling the document.
Part 1 – Creating the SharePoint Components
On your SharePoint site, you will need to create a SharePoint list, a SharePoint document library, and a SharePoint content type. Each of these components will be connected using a Power Automate flow. Please note that you will need the appropriate level of permissions to create them. If the components do not appear in your drop-down lists, you will need to ask your SharePoint administrator to grant you the permissions you need to create them.
SharePoint List
A SharePoint list is a pretty simple concept. It is a collection of data that you want to store for later use. In our case, we want to create a list of data elements that we can use to populate our documents. You can loosely compare a SharePoint list to a spreadsheet as they both contain rows and columns. You can add and remove columns, insert, delete, and edit data and share the information with others.
In our example, we are going to create a document that notifies our HR department that an employee is requesting a leave of absence. The document template will pull data from our SharePoint list to populate the fields we need to create the notification.
The screenshot below shows the rows and columns in our list. In our document automation, we are going to retrieve information from the employee, position, and date of absence columns.

Creating the List
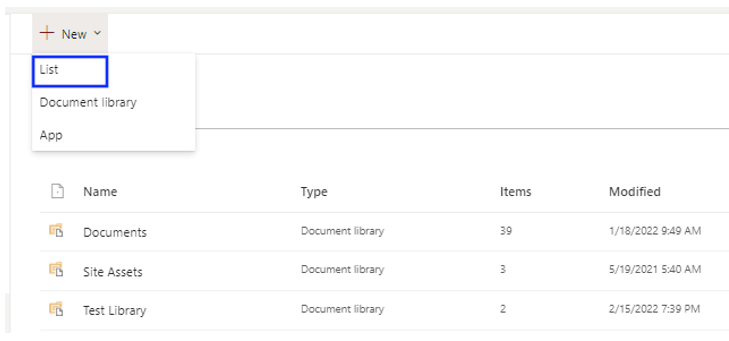
Under the Site Contents in SharePoint, create a list and name it whatever you like.
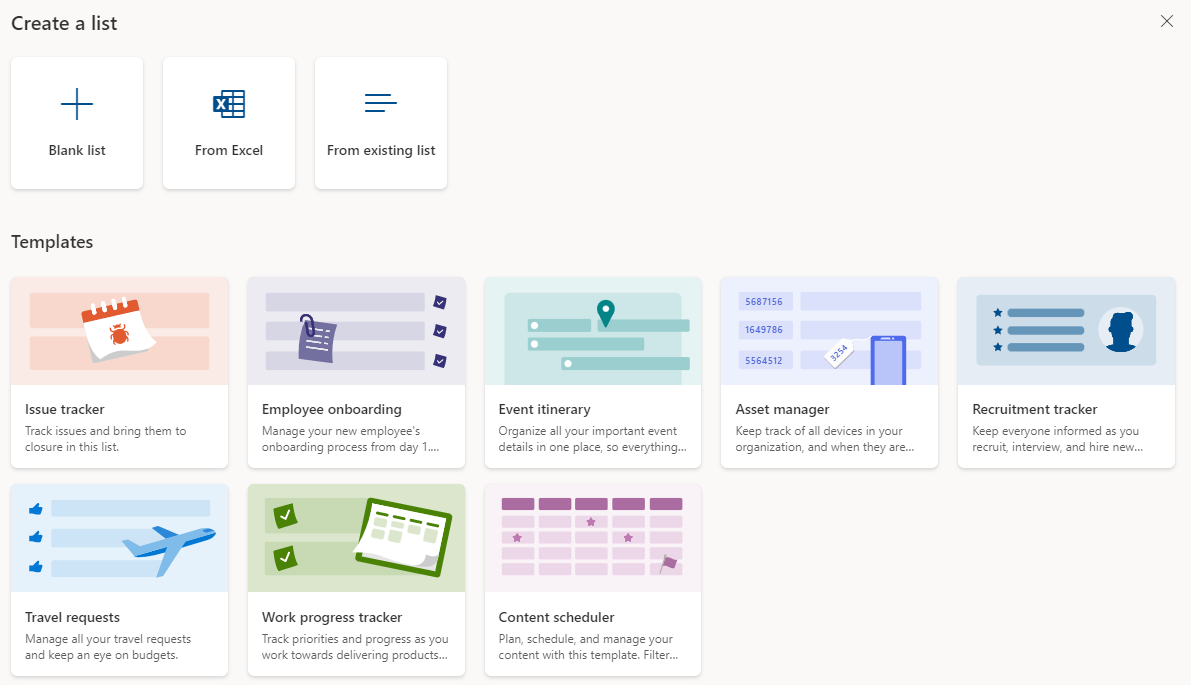
During the creation process, you’ll find that SharePoint provides you with a lot of options to create and populate your new list. We are going to create a blank list.
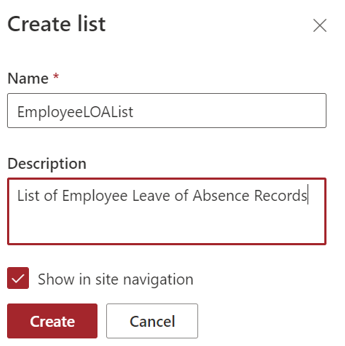
We’ll enter a name, description, and check the Show in site navigation checkbox.
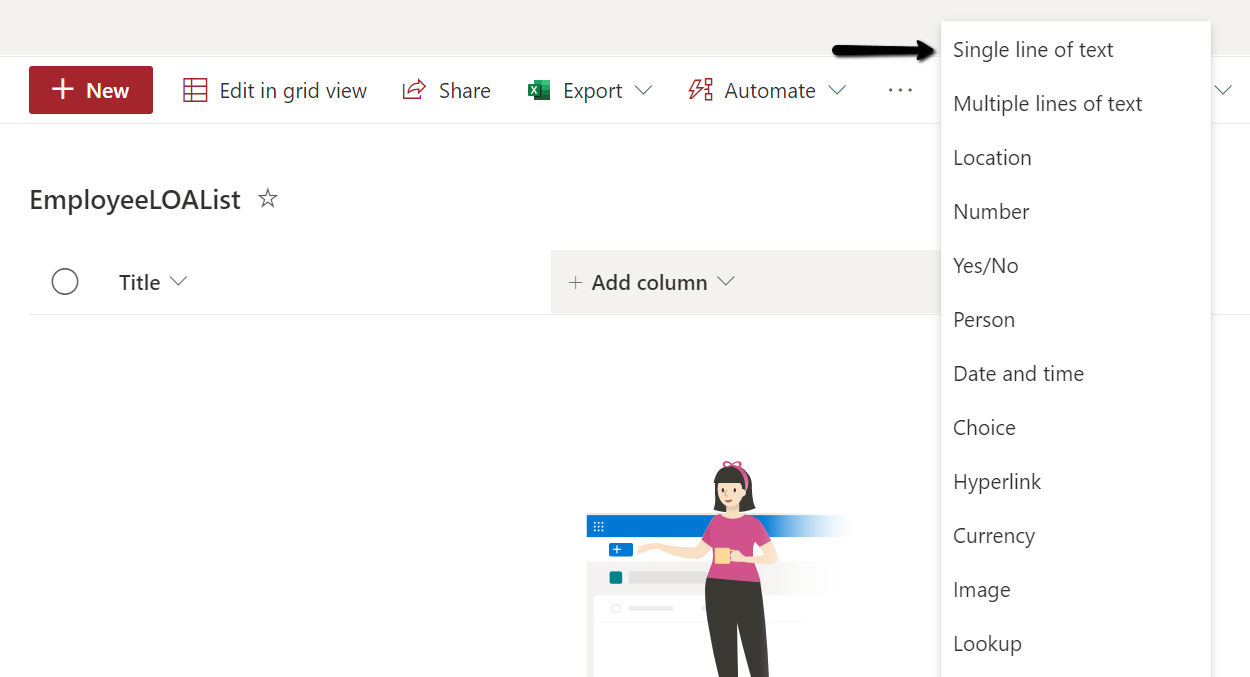
SharePoint responds with a Welcome to your new list screen. Click on +Add Column and a list of column types will appear on the right.
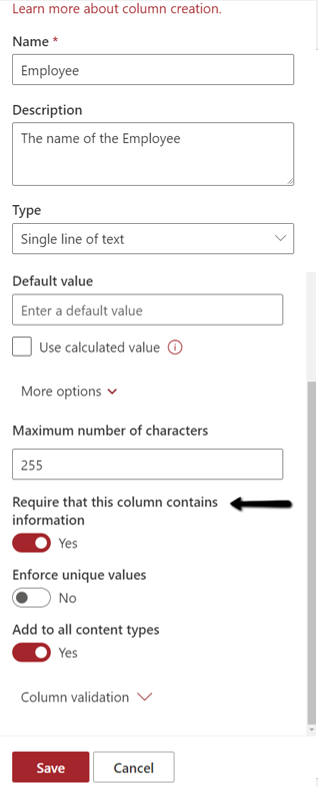
Here’s an example of creating an employee name column. Under the More options drop-down, be sure to enable the Require that this column contains information option.
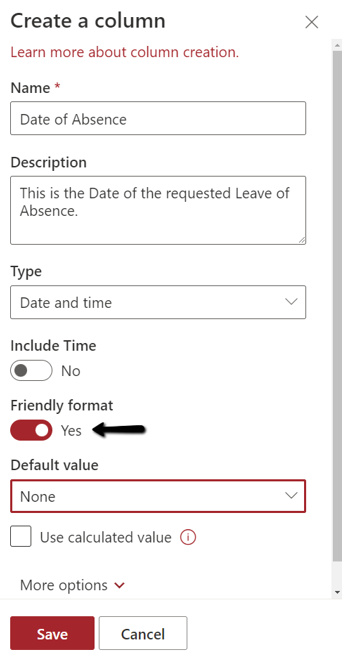
You can continue adding columns. In our example, we want to use a date and time column for the date of absence. For date and time columns, make sure to check the Friendly format option.
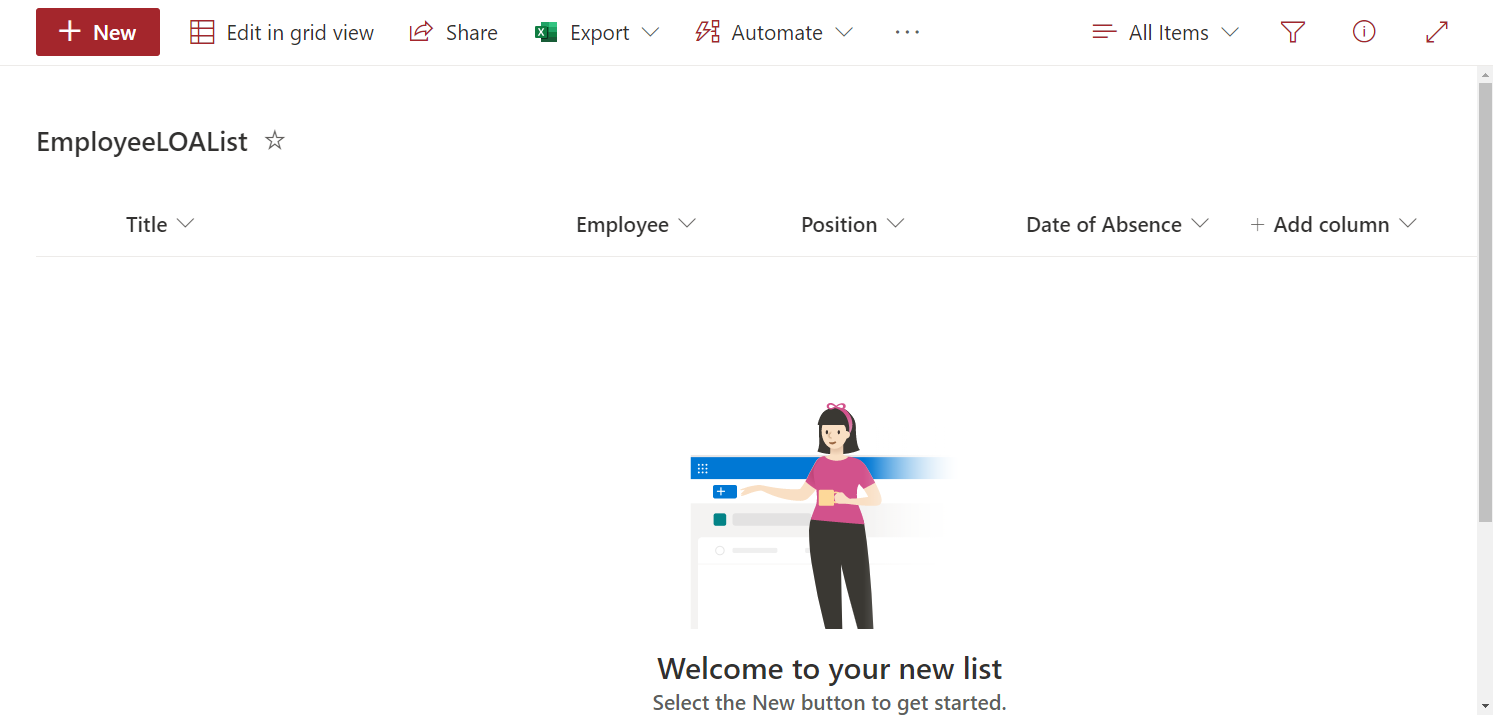
Here are the columns for our example. They are Title, Employee, Position, and Date of Absence. When you create a list in SharePoint, a Title metadata column will automatically appear. To learn more about title columns and their usage in SharePoint lists, please refer to Microsoft’s SharePoint documentation.
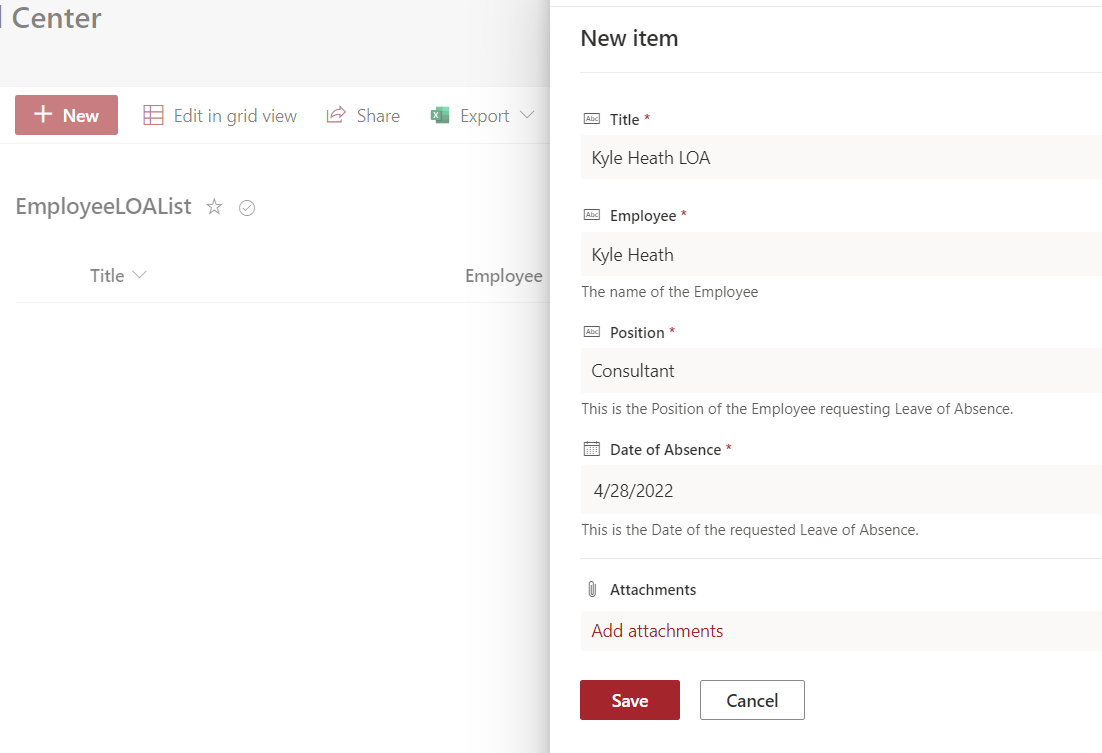
After creating all of the columns you want, you can begin adding items to your new list.
Creating the Document Library
Our next step is to create a document library. The library will hold the documents that will be automatically created by our Power Automate workflow when a list item is created or modified. To create a document library, click on the left-hand side dropdown and select Document library.
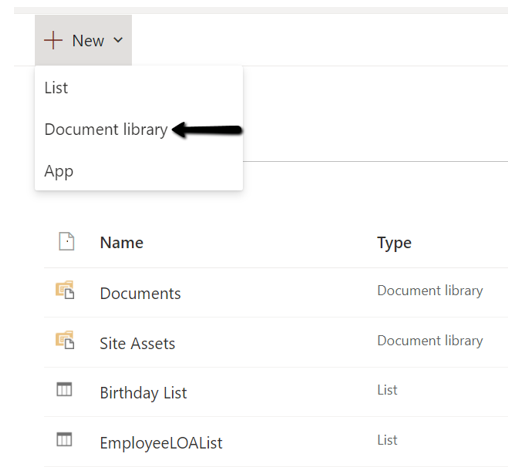
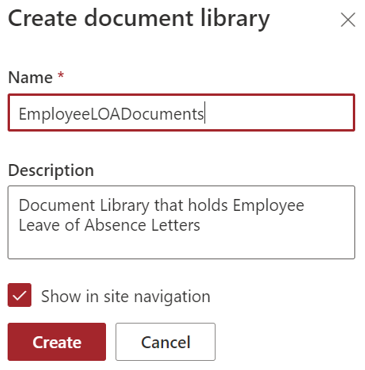
Enter the information in the pop-up that appears. Make sure to check the Show in site navigation checkbox.
Document Library Option Not Shown in Menu
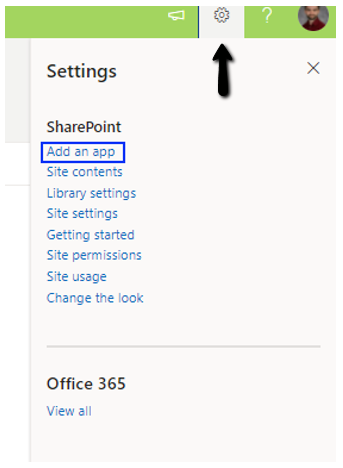
If the option for the document library is not shown in your dropdown menu, open the site settings sidebar on the upper right side of your screen, and click Add an app.
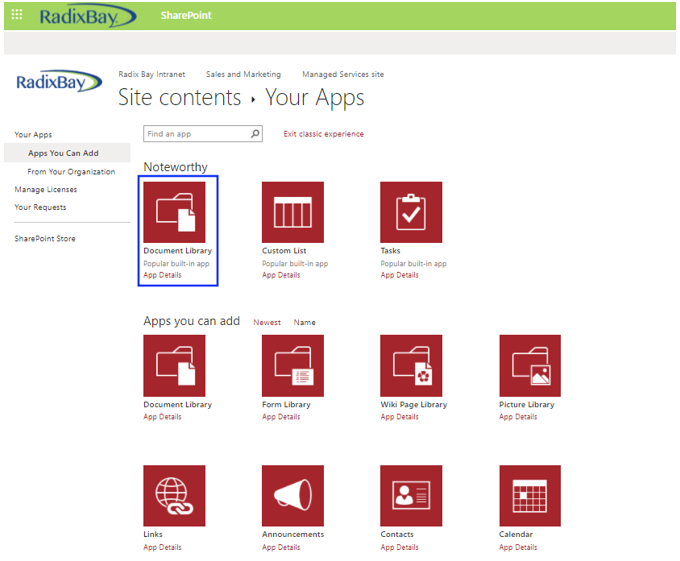
After the page opens, you will need to click on the classic experience text link.

SharePoint will display a list of components that you are permitted to add to your site. Select Document Library to create your library.
When the window appears prompting you to name your library, select Advanced Options. This will take you to a separate page where you can name your new library, configure the document template type, and specify file versioning.
The name and description fields can be anything you want. For this example, we will name our library EmployeeLOADocuments. Make sure the Document Version History is set to Yes, and the Document Template is set to the default option Microsoft Word document.
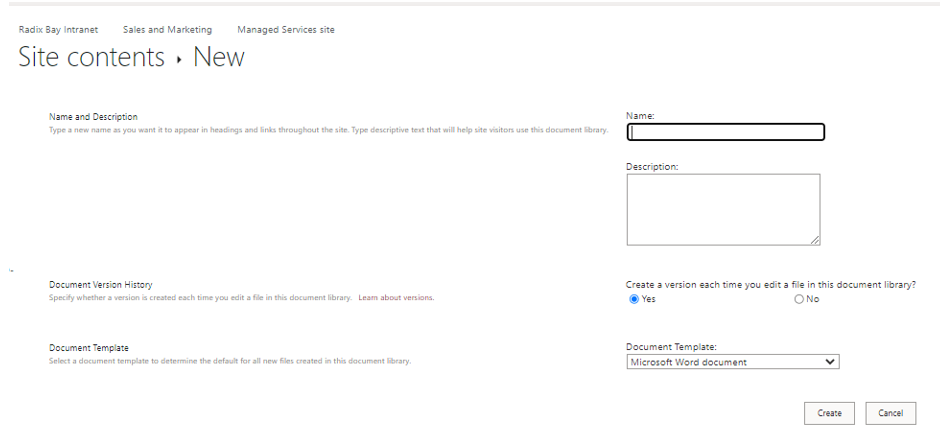
After you click create, your new library will be available to view in the Site Contents.
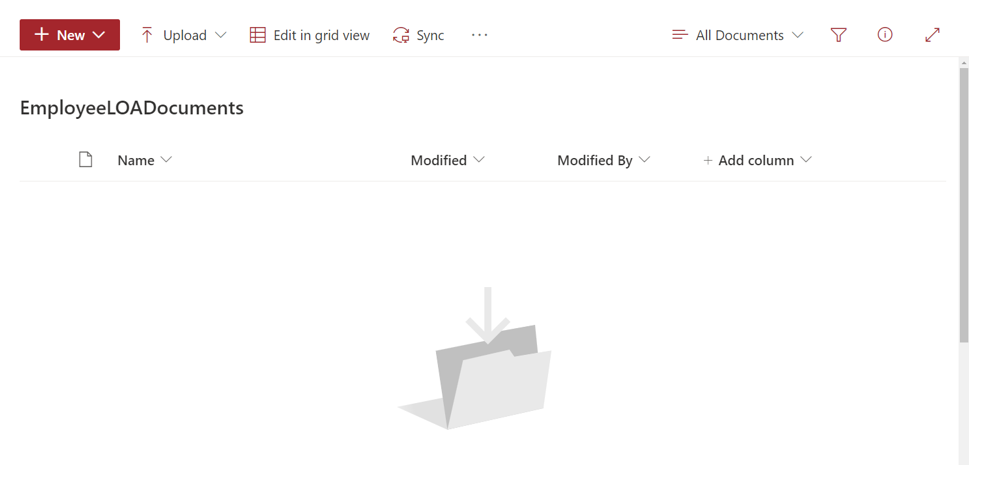
Creating a Blank Document Template
We will be creating a content type in our next step. As part of the content type configuration, we will be uploading a blank document template. In one of our last configuration steps, we will edit the template to add our employee leave of absence content and the references to the columns in our SharePoint List.
In our example, the content is a couple of sentences notifying HR that we have an employee requesting a leave of absence. Our automation will access data from our new SharePoint list to populate the fields we reference in the template.
To create the template, open up a Word document, enter some text, and save it to your computer as a .docm. The .docm tells Word that this is a macro-enabled Word document. Follow your normal naming conventions to name the document.
For this example, I named the document template EmployeeLOADocumentTemplate.docm to identify it as our employee leave of absence Word template.
Creating Content Types
Our last component to create in SharePoint is a content type. A SharePoint content type establishes a relationship between an item and information about that item. In our example, the content type will establish a relationship between the fields in our new SharePoint list and our library.
Once we configure the content type to establish the relationship, the documents in our new EmployeeLOADocuments library will be able to access the fields in our EmployeeLOAList SharePoint list. In an upcoming step, we will create a document template in that library. Our template will be able to access the columns in our EmployeeLOAList we identified in the content type.
To create and view site content types, you will need access to the Web Designer Galleries section under Site settings. Click on the gear in the upper right-hand side of your SharePoint screen. Select Site settings.
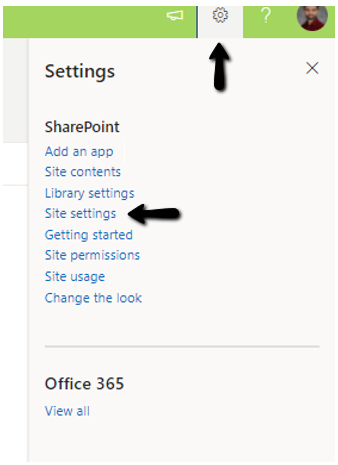
Select Site content types.
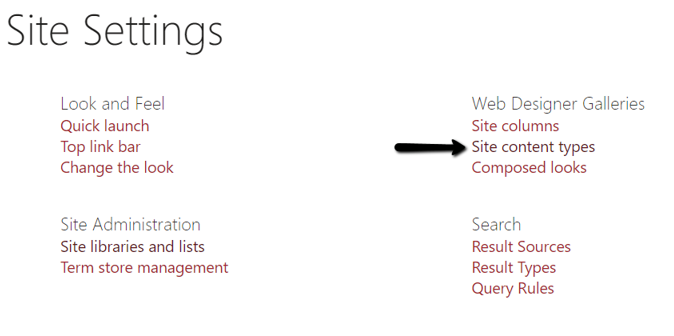
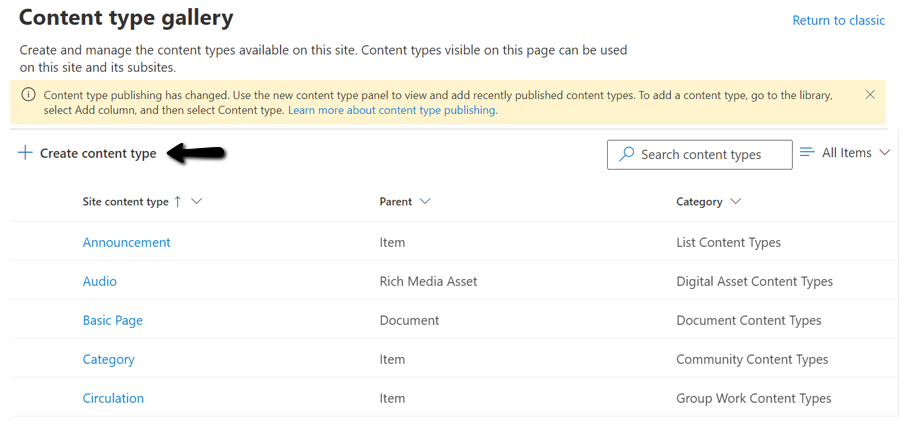
SharePoint will display a screen that allows you to create and administer content types. Select +Create content type.
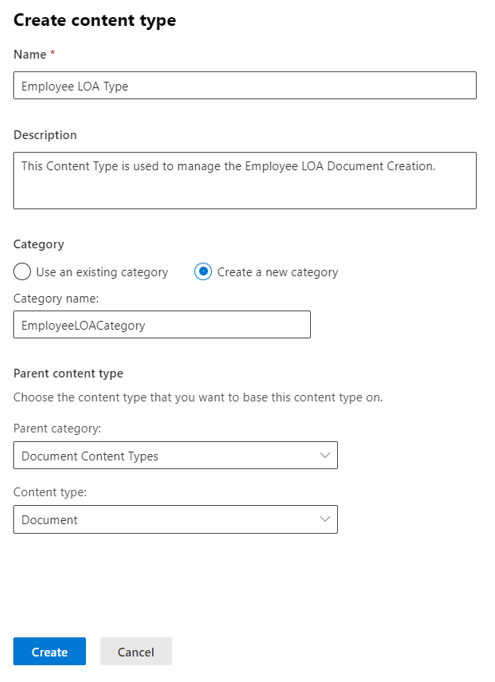
When you create the content type, enter a name and a description. For the other settings, make sure you choose the options shown in the screenshot below. Content type categories allow you to easily find and administer your content types.
Our next step is to add the document template we created earlier to our content type. This establishes a relationship between our template and our SharePoint list.
Go to SharePoint Site settings again and select Site content types.

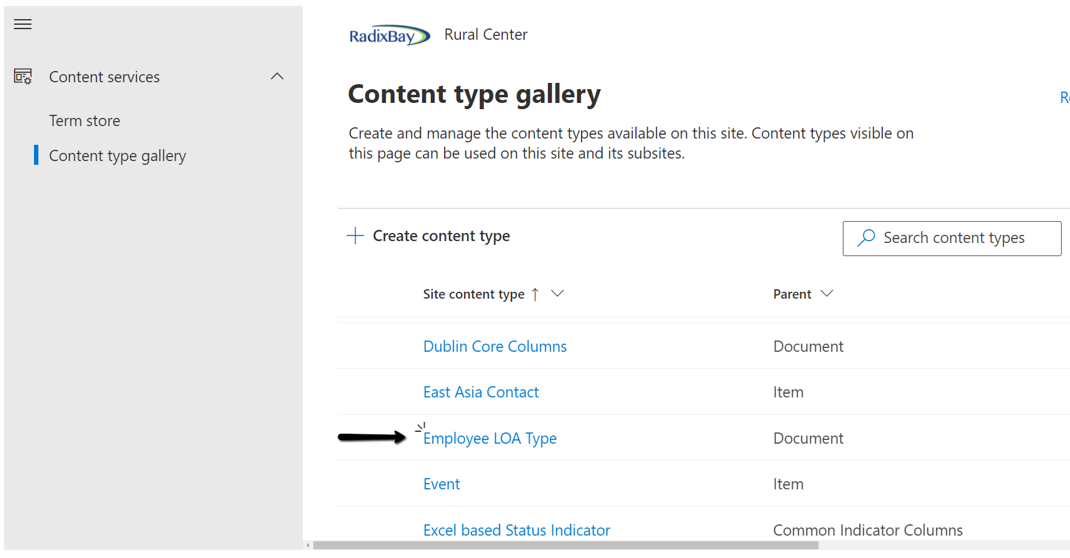
Select the content type you recently created. In our example, we are selecting Employee LOA Type.
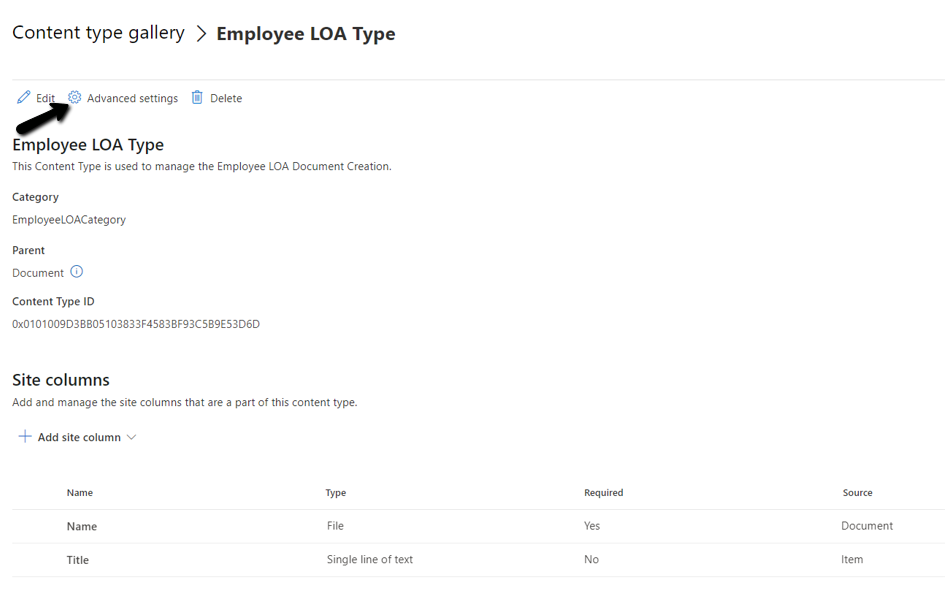
Select Advanced Settings.
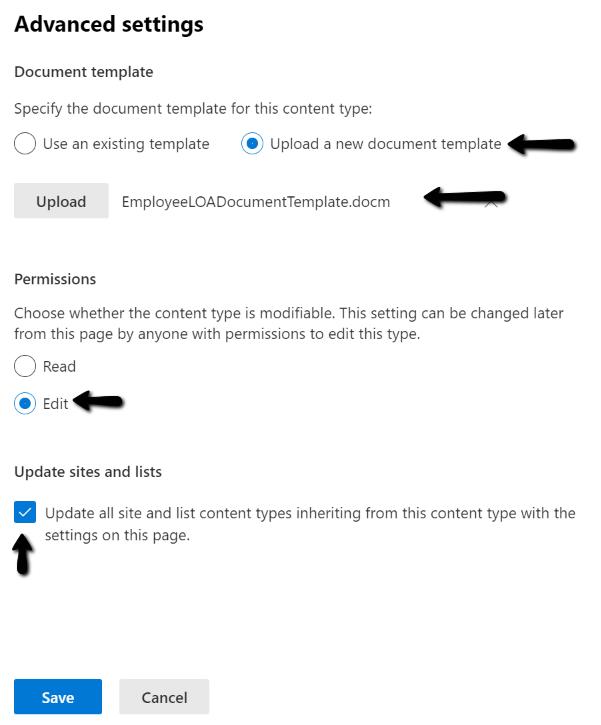
The Advanced Settings panel appears. We want to upload the blank template to our content type.
Select the Upload a new document template button.
Enter the file name of the blank document template we created earlier in the upload file name box.
Select the Edit permissions button and check the Update sites and lists checkbox.
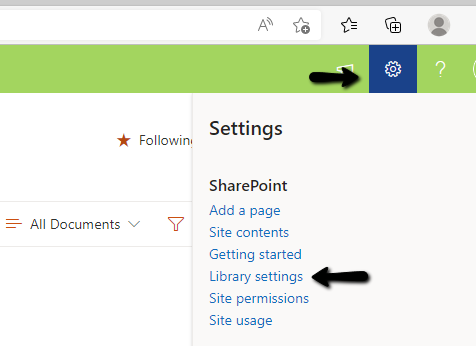
After you create the content type, navigate to the Document Library Settings for the library you created earlier. Go to your new document library and look for the gear icon in the upper right-hand corner of your document library screen and select Library settings.
Make sure the Allow management of content types? is set to Yes in the library settings. You can find the Allow management of content types field under Advanced Settings.


Navigate back to your document libray contents panel and add a new column.

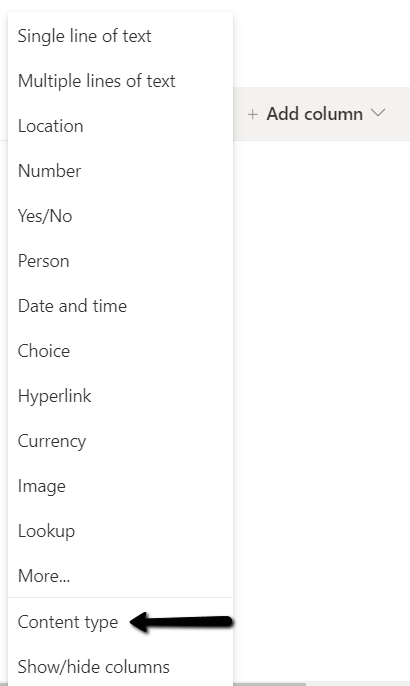
There will be a Content type option towards the bottom of the list. If the content type option does not appear, wait and try again. It may take a couple of minutes for the option to appear.
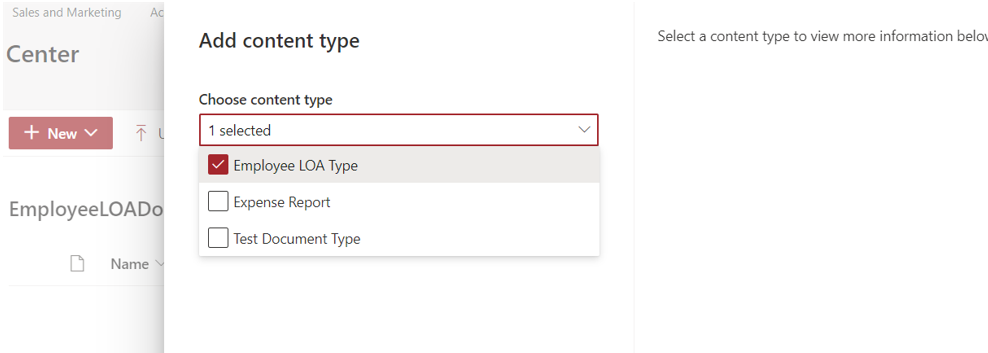
Select your newly created content type. The content type will now show up in your available content types in the document library.
Your next step is to add the content type to your new document library. Go to your new document library again and select Library settings. Under the settings panel for your new library, scroll down until you see the Content Types section.
Click on the Add from existing content types link.
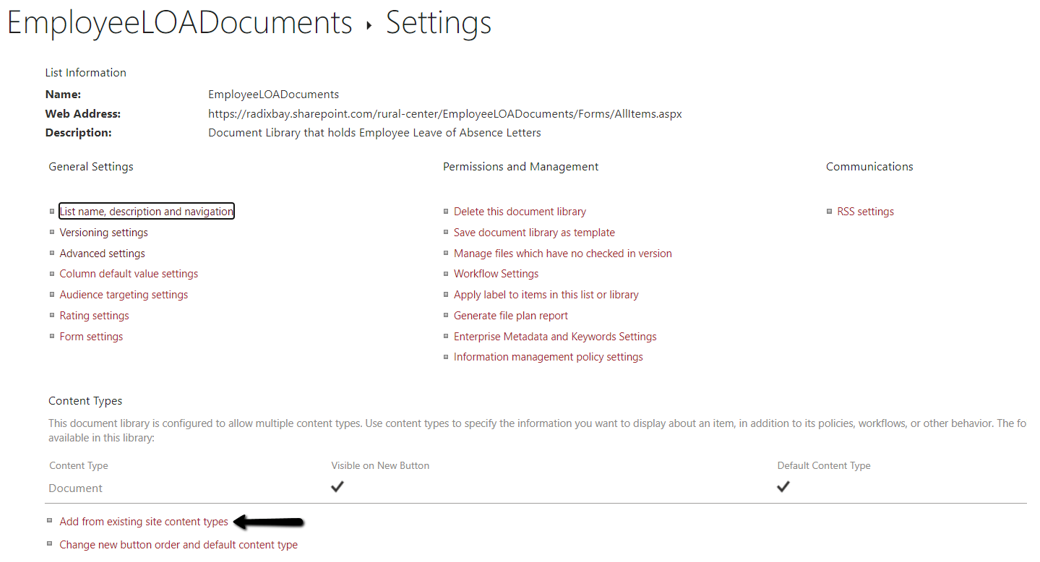
Locate the content type you recently created in the available site content types on the left side of the panel and add it to the right.
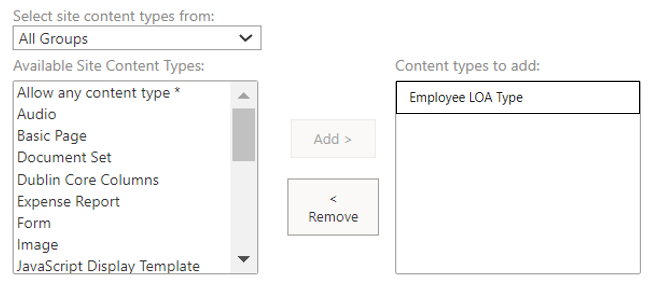
Your content type will now show up in the available content types in your document library.
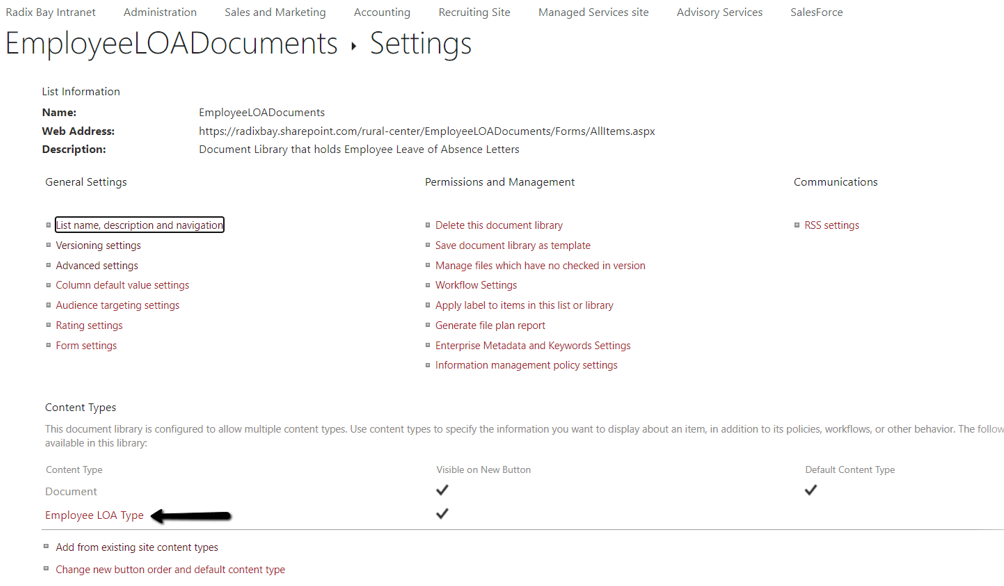
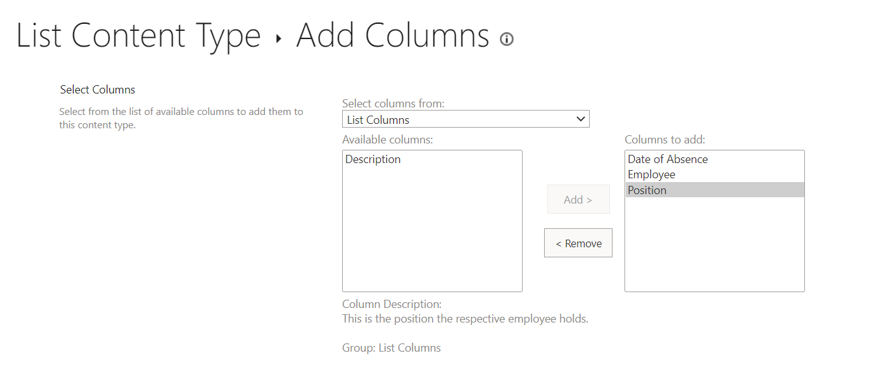
We now need to add the columns from our Employee LOA SharePoint List to the Employee LOA Type content type we just associated with our document library. This will allow us to reference the columns in our document template that we will store in our document library.
This can be done by selecting the name of the newly added content type under Content Types. In our example, it is the Employee LOA Type shown below.

SharePoint will display a page with settings and columns for the list content type. Click on Add from existing site or list columns.
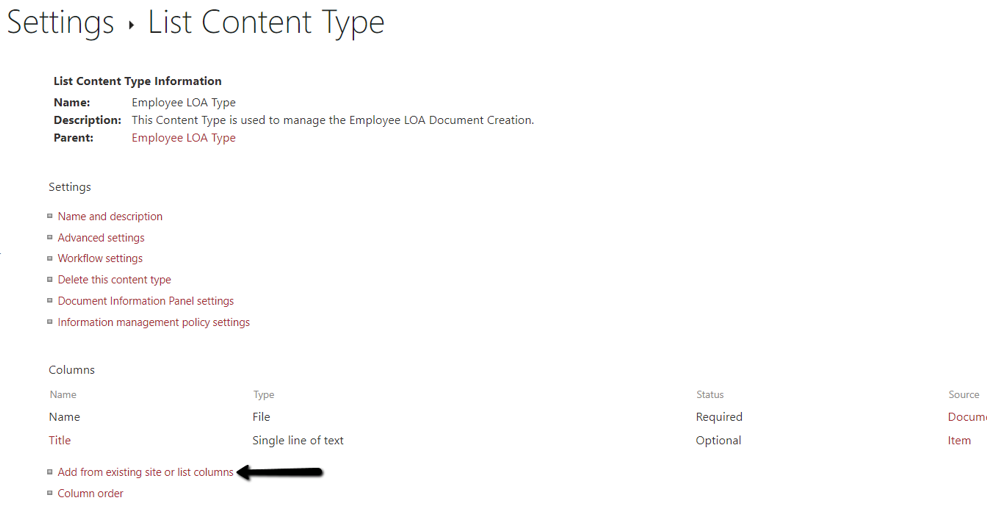
SharePoint will display a form that will allow you to add all of the columns from the list columns group. The column names will be the same as the ones that are in the SharePoint list we created. After adding and clicking OK, the columns will now appear under the columns section in our document library.
When we create our document template, we can reference the column names to enable our automation to populate the document with information stored in our SharePoint list.
Editing the Document Template
Now that we have our SharePoint objects created, we need to edit our document template. The template will be used to contain both our content and the references to the columns in our SharePoint List.
In this case, the content is a couple of sentences notifying HR that we have an employee requesting a leave of absence. Our automation will access data from our new SharePoint list to populate the fields we reference in the template.
Begin by selecting the gear icon and then Site settings.

Select Site content types.

Select the content type you recently created. In our example, we are selecting Employee LOA Type.

Select the Edit Template link.
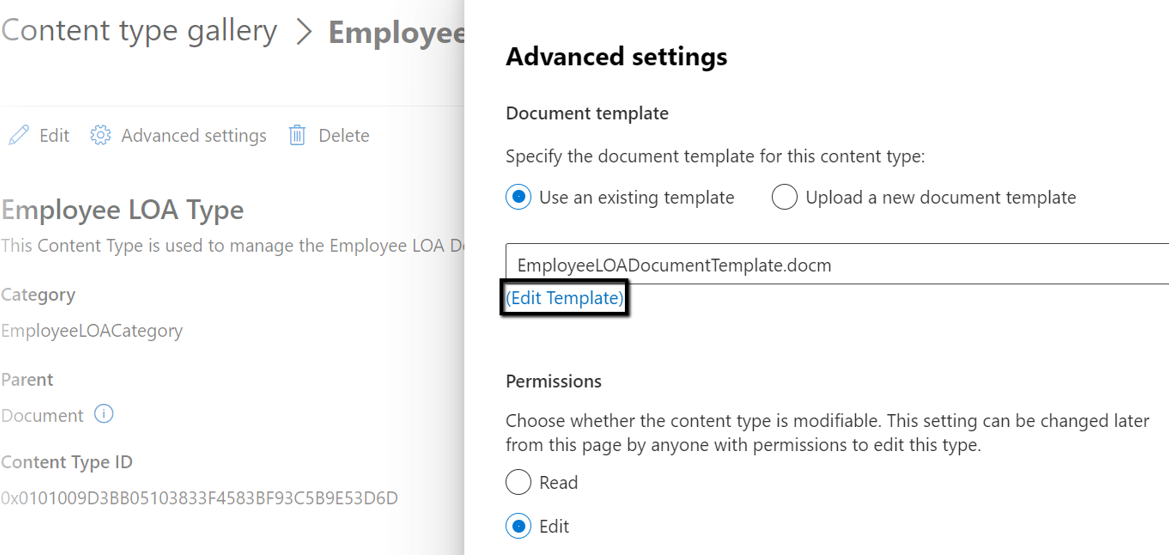
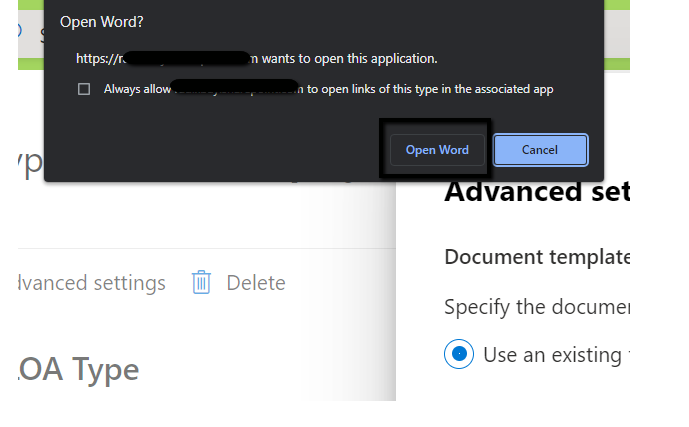
SharePoint will respond with a prompt asking if you want to open the document in its associated app. Select the Open Word button.
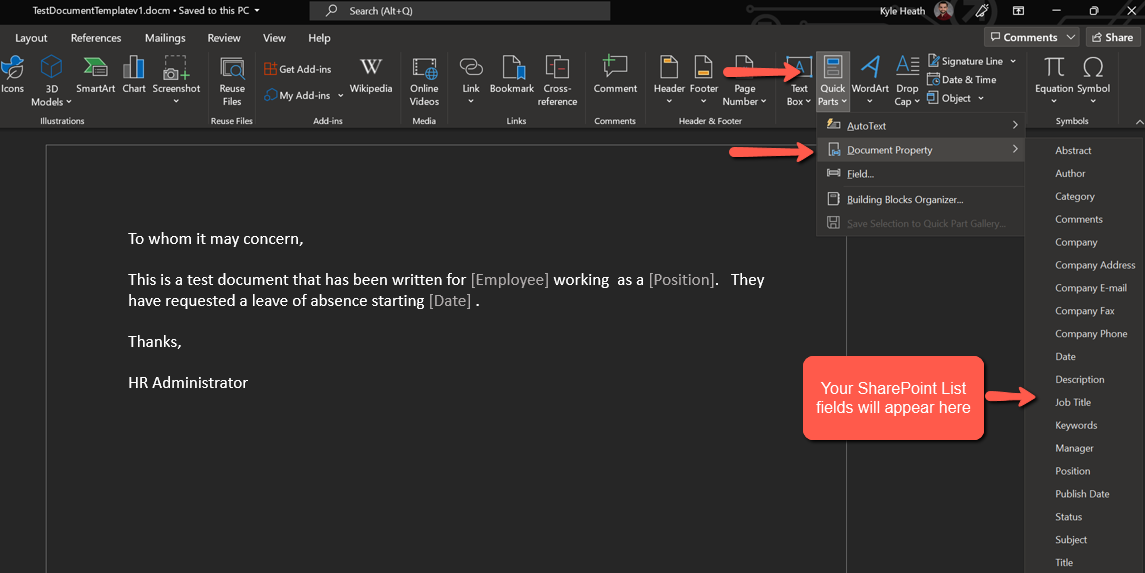
In the screenshot below, I am adding the leave of absence notification wording to the template. In the text, I am inserting references to the fields in my SharePoint list. I am able to access them in the Document Property dropdown.
When we create our automation in our next set of steps, the triggering event will be when someone adds or edits a row in our EmployeeLOAList. A step in our automation will reference this template to create our leave of absence notification document.
When you edit the document to add your content and fields from your SharePoint list, there is a possibility that you may receive an error when you attempt to save it directly to SharePoint. This occurs when SharePoint looks for document properties that don’t exist within the blank template.
If this happens, save the document to a local folder with a new name and edit it. Then upload your new local file to the content type as we did earlier in this tutorial.
Wrapup
In this first installment of my 2-part article series, we learned how to create the SharePoint objects we will use in our Power Automate workflow.
In Part 2, which is also available now, we use the components as input to a Power Automate workflow that accesses the information in our SharePoint list to create and auto-fill our leave of absence notification documents. As I stated earlier, you can easily build upon this information to create robust documents that are processed by multiple steps in highly complex, decision tree workflows.
Thanks for reading!

I hope you enjoyed my article on leveraging Microsoft Office Tools to autofill documents.
To learn more about our services and how RadixBay can help, please visit www.Radixbay.com.
Kyle Heath
RadixBay Managed Services Consultant